
TM 5-2410-240-23-3
0266
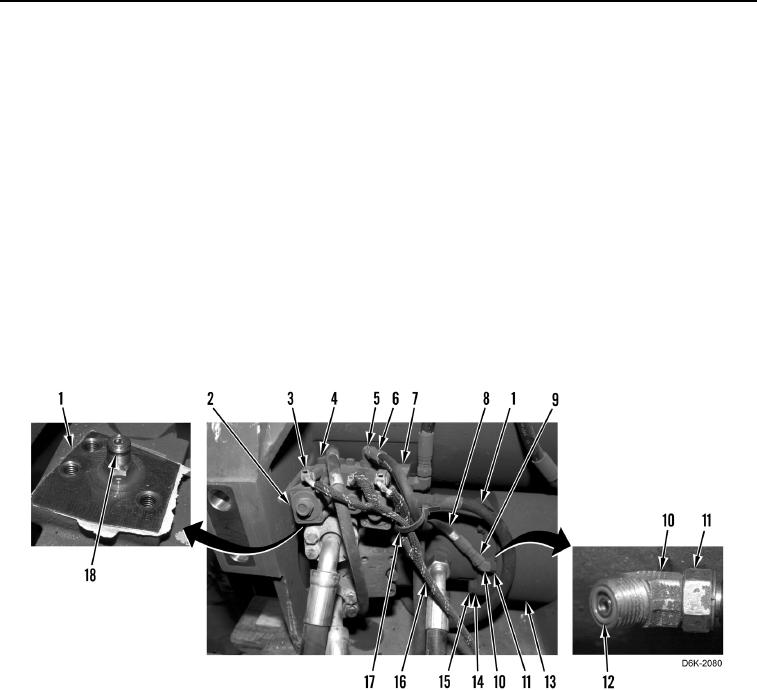
REMOVAL CONTINUED
2. Disconnect three electrical connectors (Figure 2, Item 3) from solenoids (Figure 2, Item 2).
3. Remove tiedown strap (Figure 2, Item 17) from winch harness (Figure 2, Item 16) and winch hose (Figure 2,
Item 8). Discard tiedown strap and position winch harness aside.
4. Loosen fastener (Figure 2, Item 9) and disconnect winch hose (Figure 2, Item 8) from fitting (Figure 2, Item 10).
5. Loosen nut (Figure 2, Item 11) and rotate fitting (Figure 2, Item 10) clockwise.
6. Remove O-ring (Figure 2, Item 12) from fittings (Figure 2, Item 10). Discard O-ring.
7. Loosen five fasteners (Figure 2, Item 6) and disconnect winch hoses (Figure 2, Item 8) from fittings (Figure 2,
Item 5). Position winch hoses aside.
8. Remove four bolts (Figure 2, Item 15) and washers (Figure 2, Item 14) from motor assembly (Figure 2, Item 1)
on winch (Figure 2, Item 13).
9. Rotate motor assembly (Figure 2, Item 1) clockwise.
10. Remove three bolts (Figure 2, Item 4) and winch manifold (Figure 2, Item 7) from motor assembly (Figure 2,
Item 1).
11. Remove O-ring (Figure 2, Item 18) from winch motor assembly (Figure 2, Item 1). Discard O-ring.
Figure 2. Winch Manifold, Fittings, O-rings, and Retaining Hardware.
0266
END OF TASK